Gaea tutorial: Texturing in Gaea
A copy of this tutorial is available on the FAF wiki.
This tutorial focusses on texturing your maps with Gaea.
Using Gaea to texture your map can be used as a way to quickly experiment with different aestethics, to verify your masks are set up correctly, and as the basis for map-wide albedo decals. This tutorial will explain how to quickly design a possible map design, set up Gaea in a way that emulates how the FAF editor applies textures, and how to use this to create a textured map.
In the end, creating texture designs is a matter of taste. I normally prefer creating maps that look and feel like they are mostly natural, and make my design choices accordingly. However, given that this game of ours is about big robots fighting on alien planets, it is up to you to decide what colour and style your rocks, sand, ice, and 'grass' have. As such, in this tutorial I will try and show you the concepts behind creating these kind of map designs, rather than show you how to make any specific map designs.
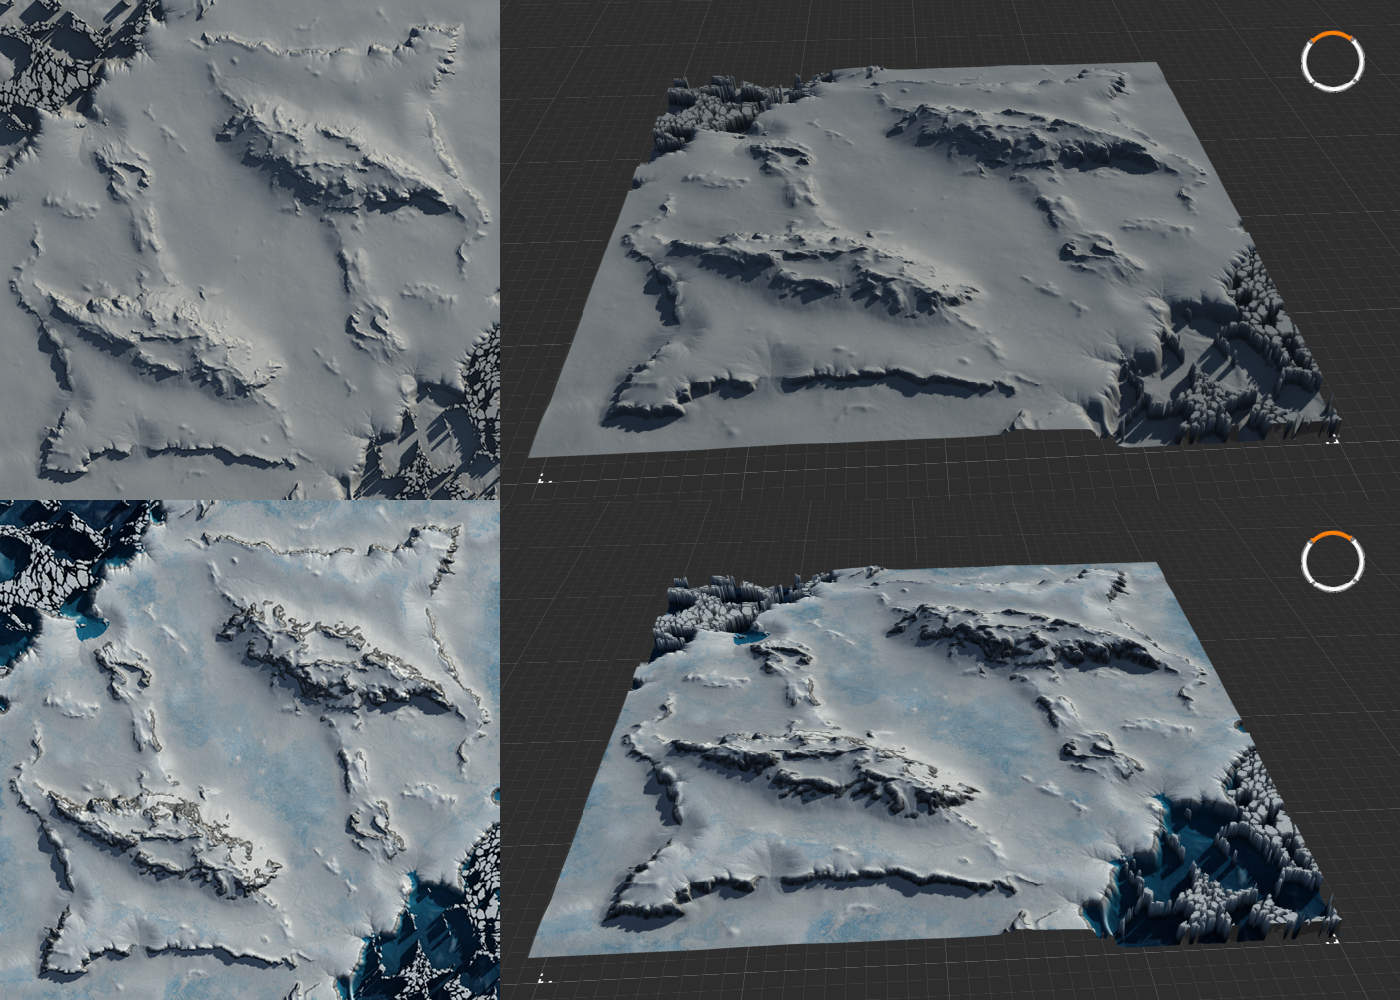
Figure 1: Example of a non-textured and textured version of my map Project Albus in Gaea.
Prerequisites
This tutorial assumes you've got a basic understanding of image editing and FAF mapping. Additionally, it is suggested you familiarize yourself with the concept of visual node based programming. A very rudimentary understanding of Gaea is also required: while I will discuss the relevant nodes and how they work, I will leave familiarizing yourself with the software for self study. Watch a few youtube tutorials on the basics, or read the general introduction to Gaea here.
Required for this tutorial is a copy of Gaea (the indie version is free to use and more than sufficient for maps up to 20km), which can be downloaded here. Additionally, an image editor such as Photoshop or Gimp is required, though the free to use online photoshop-clone Photopea works fine too. Lastly, you will need the the FAF map editor.
As with texturing in the FAF editor, applying textures to specific areas of the terrain requires masks. Creating masks in Gaea is relatively simple, but allows for high detail and complexity. As such, a seperate tutorial has been made available here.
Terminology
In my conversations with others in the FAF discord's mapping-general channel, I've come to realize that explaining certain concepts can be a bit challenging, primarily due to the lack of clear definitions and names for some elements. To ensure that we're all on the same page, please refer to the terminology page for definitions of mapping-related terms.
In this tutorial specifically, I will be using the noun texture to mean those little tile-able images you may use in the FAF editor to cover a stratum. The verb to texture will be used to refer to everything that has to do with applying colour and textures to the terrain. When using colour-nodes in Gaea to add colour to the terrain, I will be refering to the product of those nodes as a texture design or map design. Such a map design can be used to create what other tutorials refer to as map wide albedo-decals or texture decals, the use of which is explained in a seperate tutorial.
Note that the terminology list does not include the specific names for less common terms, such as the names of elements of Gaea, as those are defined in their respective tutorials.
A review of texturing basics
In this tutorial I will introduce a workflow that aims to emulate the way that textures are applied in FAF. We will setup a graph that emulates a maximum of nine stratums, one base stratum and 8 stratums with accompanying stratum masks, stacked on top of eachother. However, the texturing in Gaea will always be an approximation of what the map will look like in the FAF editor, as the approach differs in a few critical areas. Firstly, FAF uses tiled textures: textures are repeated over the map and exposed to certain parts of the terrain using masks. Interestingly, in some way this results in both higher and lower resolution. The resolution of the textures for each pixel of the heightmap will be bigger in game: the tiled textures, especially at a low zoom-level, will result in far higher pixel density per area of the map than compared to a map-wide decal. However, since these textures are tiled, the textures aren't specific to individual pixels of the terrain heightmap, except in the sense that they are exposed to specific parts of the terrain.
Alternatively, you could texture a map using a map-wide albedo decal. Unlike tiled textures, this approach will allow you to be very specific in assign colours and texture to specific parts of the map. However, due to file size restrictions you will not be able to approach the resolution per heightmap-pixel that tiled textures will provide you. Although 16K textures might suffice for 5km maps, generally the resulting file size makes using this approach prohibitive. As a result, map-wide albedo decals should not be depended on to texture the full map without support from the tiled textures.
A better approach, to get the best of both methods, is to create a textured map in Gaea, use the result to render a map-wide albedo decall, and use that decall to support and enhance the textures applied by using the stratum layers and stratum masks. As the approach here detailed requires you to setup stratum masks anyway, using this method should not be much more effort.
Colour nodes
To texture your heightmap, there are several important nodes that you should familiarize yourself with. These nodes generally are coloured purple, designating that these nodes provide or process colour-data. Similarly, the combine node, which normally maintains a light blue colour to indicate it being part of the 'Adjustments' group of nodes, will turn purple when used to combine colour layers.
Quick Colour
A basic node that creates colour is the QuickColor node, which generates a gradient using two selected colours. This gradient is applied to the heightmap using the height values: the first colour is assigned to the highest part of the heightmap, and the second colour is applied to the lowest part, with all other colours of that gradient applied to the values in between these two extremes. A bias slider is available to shift the middlepoint of the gradient in either direction, letting you adjust how the gradient is applied to the heightmap. Increasing the value for Input noise will make the gradient noisy rather than smooth.
Aside from using the gradient this node can produce, you may choose to select the same colour for both options, creating a single colour. When combined with the Constant node, this can be used to create a flat plane of one pure colour, which is a good way to approximate the result you would achieve in the FAF editor—an approach that will be discussed in detail below.
CLUTer and Synth
The CLUTer node is, in essence, an advanced version of the QuickColor node. Rather than selecting two colours to form a gradient between, CLUTer allows you to select multiple colours, and move these colours along the gradient, to create complex gradients. The Synth node behaves similarly, but allows you to provide an image to sample the colours from. These two nodes can be used to create more complex colour patterns, and might be used to create map-wide albedo textures.
SatMap
The SatMaps node is similar to the CLUTer and Synth nodes, but provides complex gradients out of the box. Several hundreds of gradient presets based on satelite images are available, such as those based on mountains, deserts, and other iconic terrain. This node is a fantastic way to add a lot of colour detail to your texture, although some finetuning is often required; as these gradients were made with complex terrain in mind, the often simpler heightmaps made for FAF maps might not always produce great results out of the box.
Experimenting with this node in my past projects, I've found that the best SatMaps are those with smoother gradients and fewer distinctly different colours. Additionally, by adding additional geometry to the terrain, or by using Data nodes that generate detail data masks, such as the Texture, Soil, Rockmap, or SurfTex nodes, you usually can get better results.
Combining several SatMaps, limited to specific parts of the heightmap by masks, is a great way to get a complex and well textured map quickly.
ColorFX
The ColorFX node serves as a way to make adjustments to colour-related nodes, in the same way that the FX node allows you to make adjustments to heightmap greyscale values. Some colour nodes have a post-processing menu, but for those that don't this node offers all the same adjustments. This node may be used to do such things as adjust the brightness and contrast; make adjustments to the hue, saturation, and lightness (HSL); apply autolevel, equalize, or gamma adjustments; and perform adjustments that affect clarity, noise, and blur.
Creating a map design
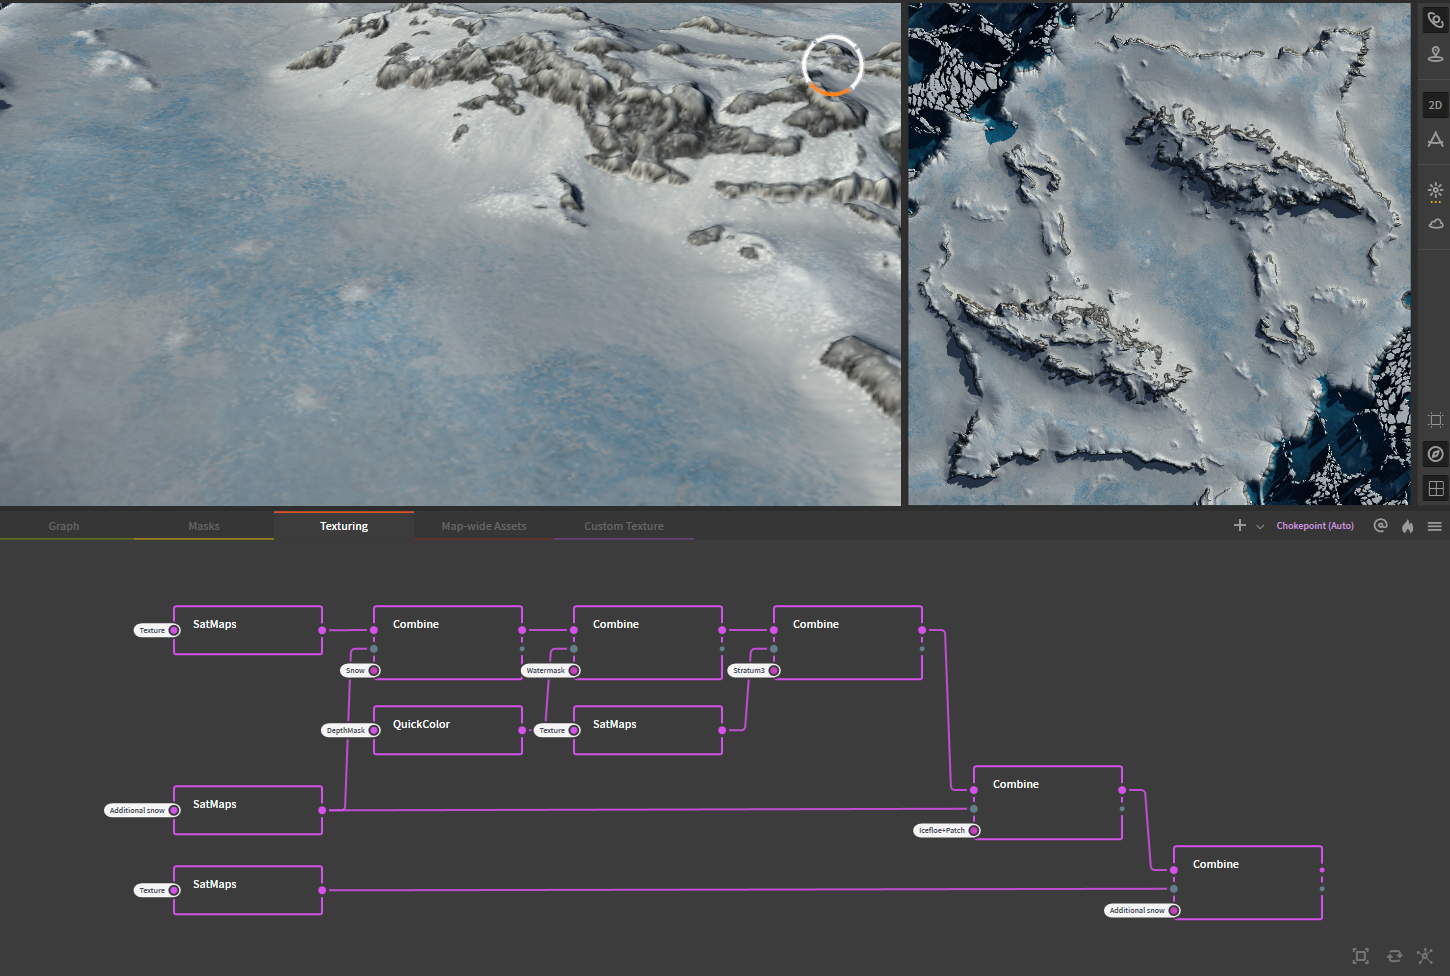
Figure 2: Overview of simple setup using SatMaps to texture the map Project Albus
Combining several different SatMaps together is a great way to quickly brainstorm different designs, or to make a map-wide albedo decall, without having to prepare the exact setup needed to emulate how the FAF editor would treat different stratum layers. Usually, I tend to create a map design by building different layers on top of eachother, in the same way you would see different layers of materials out in nature.
As mentioned, combining several SatMaps together usually works rather well. Combining these is as simple as creating two SatMaps nodes, connecting their inputs to the terrain (or such nodes as Texture, Soil, etc.) and then connecting both to the Combine node. Generally, the mode 'Blend' works best, and the strength of the combine node may be adjusted to get the preferred effect. Using the mask-input of the Combine node, we can guide where each of the SatMaps is exposed.
Example: Map design for Project Albus
SatMaps really start to shine when combined with other SatMaps node using more complex masks. This setup does the following:
- The first
SatMaps takes the input from a Texture node, and creates a base layer of grey rock with some lighter grey highlights.
- This
SatMaps is combined with one that is mostly white, which textures the first snow layer of the map using the corresponding 'snow' mask, which was prepared earlier (not shown).
- A
QuickColor node is used to create a simple gradient to add in the colour for the water. Though this could be skipped, as water is added not by textures but by the dedicated water settings, but I have added the water here to give a better sense of the overal aesthetics. The mask used for this Combine node is derived from a Sea node (not shown).
- A third
SatMaps brings in several shades of blue to texture ice. The mask for this layer has been warped and otherwise manipulated so that the texture is not applied symmetrically, which I've found looks significantly better and does not affect gameplay.
- The second
SatMaps is re-used to apply a thinner coating of snow on top of the ice. This results in a better blend between the ice and the snow, and really sells the idea of snow having fallen/been blown on top of the other terrain.
- A second snow-coloured
SatMaps is used to add additional details to the terrain. The difference is difficult to see on the images above, but significant when seen in Gaea and the FAF editor.
Combined, we now have a well-textured map, one that was relatively quick to set up, which can serve as a reference when setting up the final stratum masks to texture the map in the FAF editor. To test the stratum masks, the FAF editor can be emulated within Gaea.
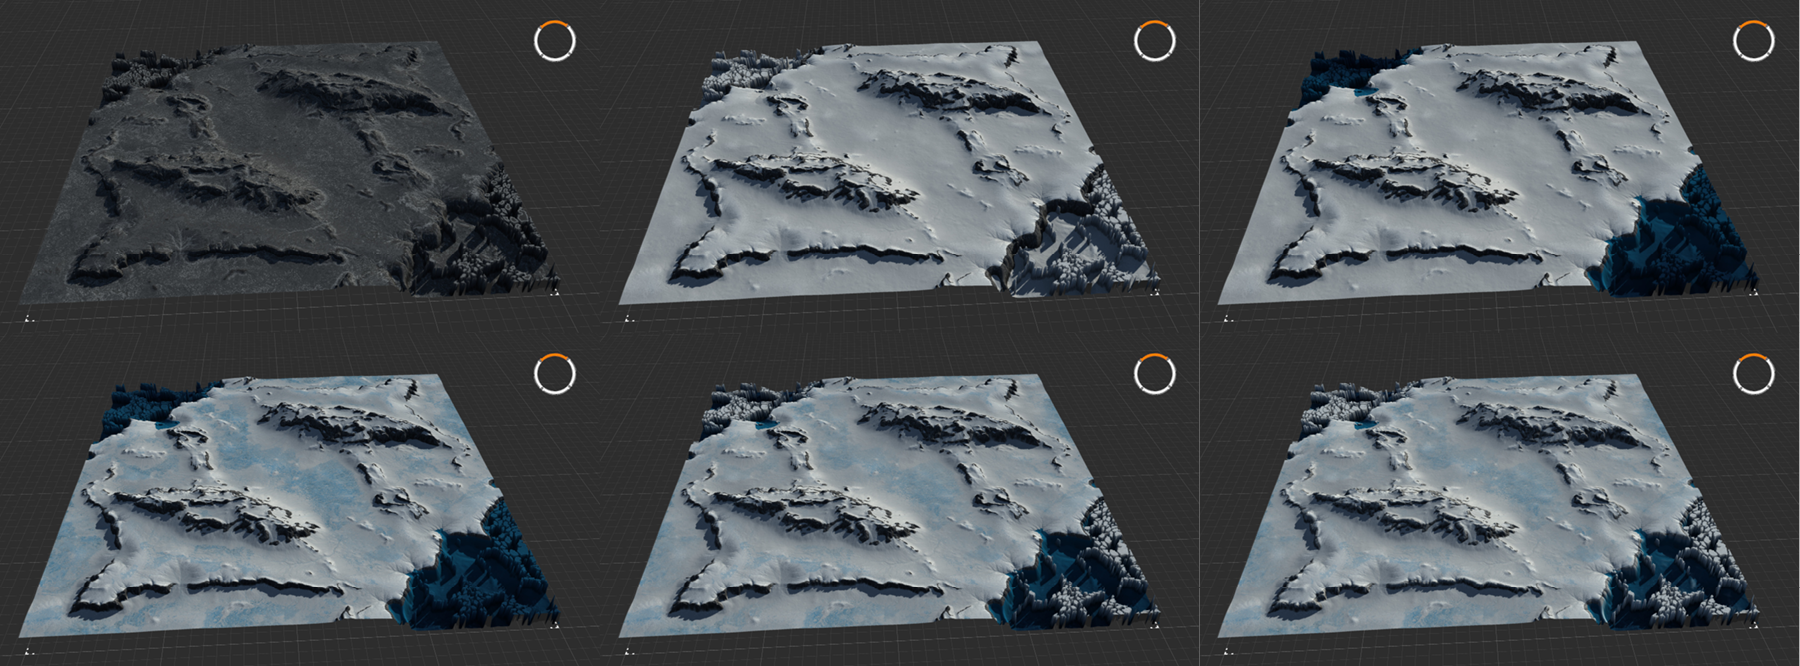
Figure 3: Result of combining SatMaps following the setup of Figure 2 using masks (set-up not shown)
Emulating the FAF editor
The FAF editor takes textures, tiles them, and then applies them to the terrain in places specified by the stratum masks. A total of 10 stratums are available although only eight will accept a stratum mask, with the remaining two stratums serving as a base and top layer. These stratums are stacked on top of eachother, with each successive stratum applying the texture on top of the previous. To emulate this approach in Gaea, we need to recreate all of these elements.
The tiled textures cannot be replicated within Gaea in the same level of detail. Instead, we can approximate the textures by creating a solid colour swatch using a Constant, 0% and a QuickColor node. This is important, because any variation in colour should come as a result of the interpretation of the mask and the blending, not from this 'fake' texture.
Eight sequential Combine, Blend, 100% nodes emulate the eight stacked stratum layers, with each next Combine node using the input from the previous to add new content to. Just as how the FAF editor does not allow different stratums to blend with variable strength, the blending strength of the Combine node should remain at 100% for all nodes. Any customization to the strength of the blending of the layers should be performed on the masks instead.
As the QuickColor nodes are connected to the flat plane provided by the Constant node, Gaea will not show the textures applied to our heightmap by default. To provide the right underlay, the last node of the heightmap graph should be pinned (by selecting the node pressing G, or by right clicking the node and selecting 'Pin as Underlay'). If you have organized your graphs over several graph tabs, you might want to create a portal from the last node of the heightmap graph, and adding a chokepoint or other placeholder node connected to that portal to allow quick selection of the terrain for underlaying.
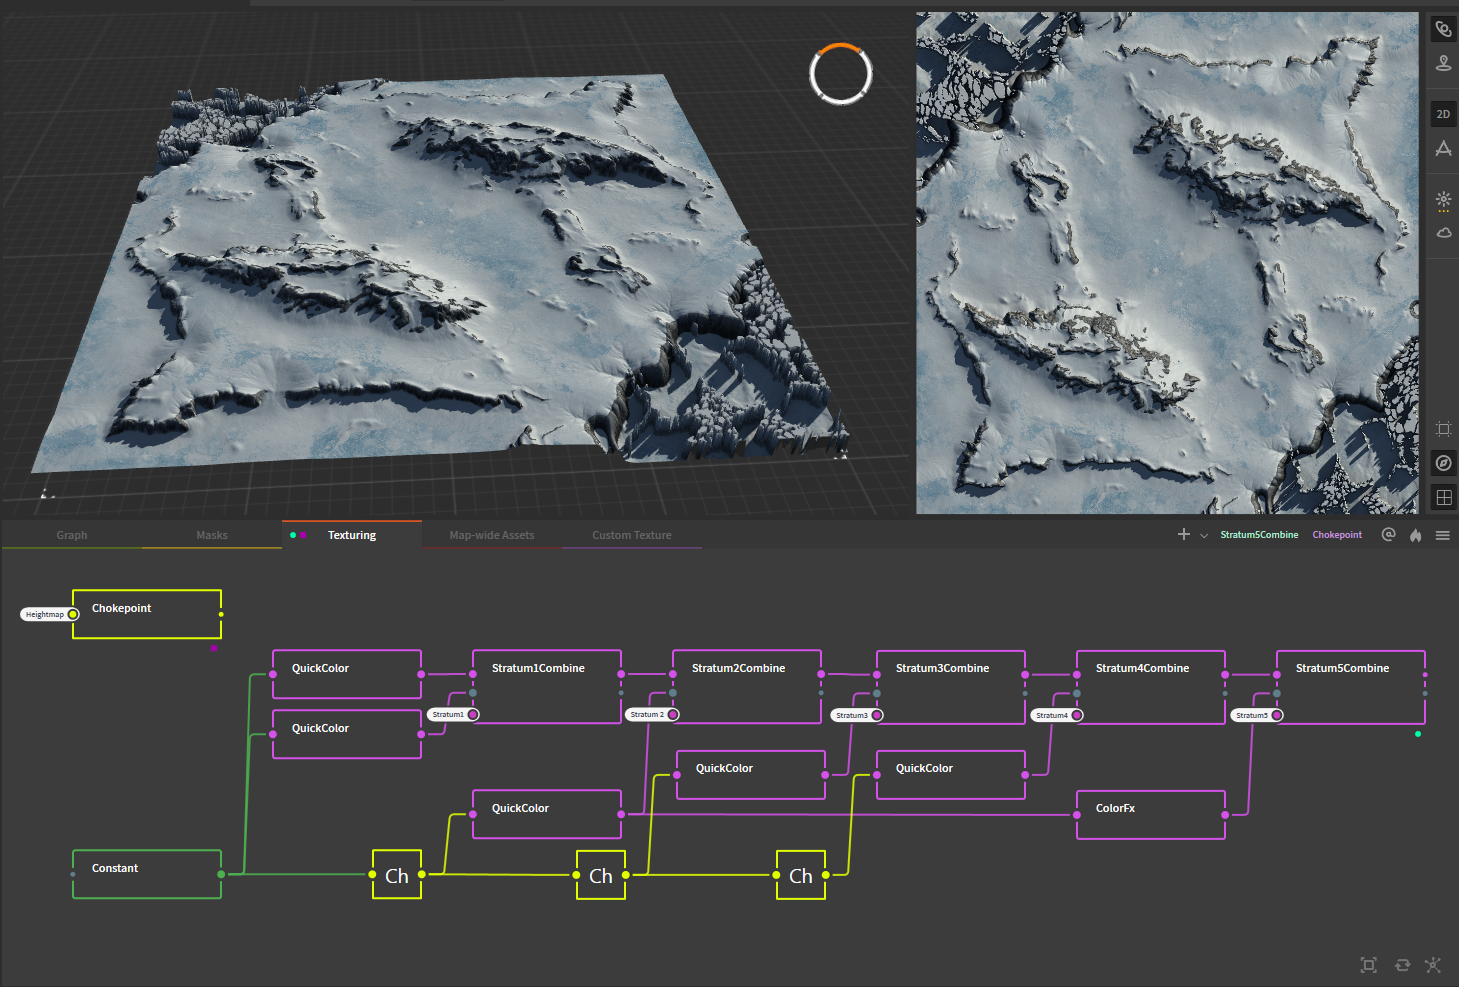
Figure 4: Emulating the FAF editor by sequentially stacking Combine nodes and feeding them QuickColor nodes and masks.
With carefull tweaking of the masks and selecting the correct color in the QuickColor node, it is possible to get very similar results as provided by the SatMaps node based texture design. Once the design is complete, both the stratum masks and the QuickColor nodes may be exported to recreate the design within the FAF editor. If the QuickColor nodes are exported as well, they may be used instead of the default textures to get the most accurate recreation of the Gaea design.
As these 'textures' consist of single coloured planes however, this approach will not provide you with the same level of resolution proper textures will provide.
Creating custom textures in Gaea
Thus far, we have explored how we can use Gaea to get a map design together, focussing on the larger work of texturing the map as a whole. However, we can also use Gaea to create the tileable textures that we can use in the editor to decorate the terrain with. Creating such textures in Gaea has the benefit that you can tailor your textures to your map specifically, with infinite customizability and without having to navigate any issues stemming from license restrictions.
To work well in the FAF editor, any texture we make should be tileable: repeating the texture should not result in obvious seams. Luckily, there are a few node that we can use to achieve this with little effort. Furthermore, we would like to generate a corresponding normal-map for our texture as well. In regards to the resolution of the texture, we have to keep in mind that the filesize of the texture increases significantly at higher image resolutions. Generally, 512px textures will suffice, although 1k textures are certainly possible and producing these comes at no extra effort with the way Gaea allows us to select the export resolution at any step of the process.
Example: Ice texture for Project Albus
For Project Albus I created an ice texture, matched to the shades of blue I previously selected while making the texture design. For this texture, I wanted to cracks in a sheet of ice, with some colour variation throughout the ice and some traces of snow or scuffed ice. (See figure 5 below).
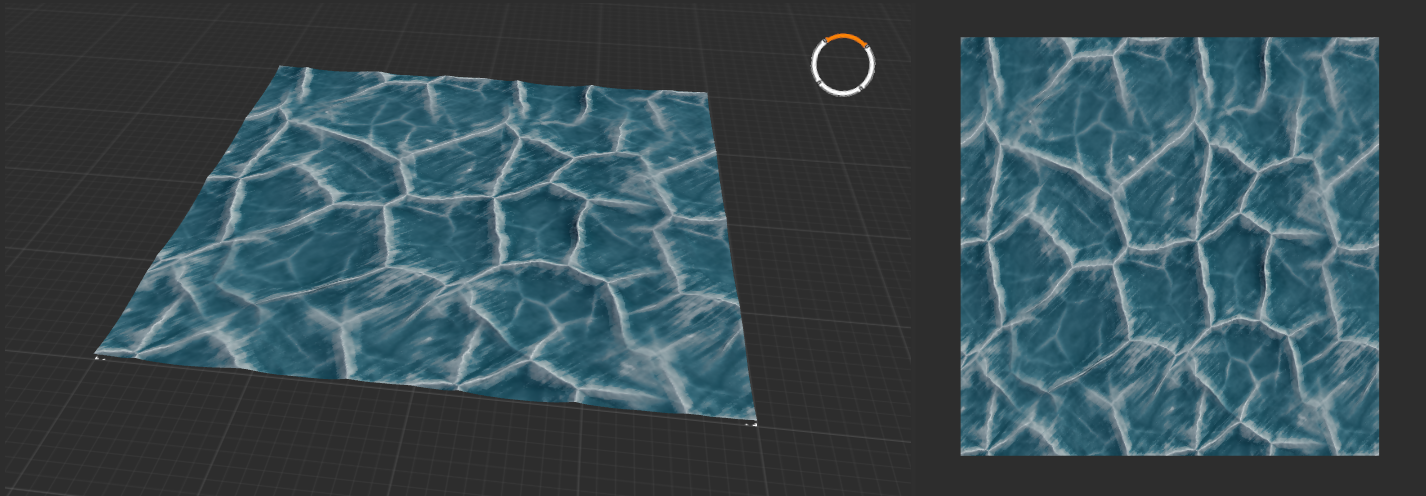
Figure 5: Custom ice texture created for Project Albus
To start, I used a combination of two Voronoi nodes at different scales: one larger for the main cracks, and one with a smaller scale to add more detailed cracks throughout. The Voronoi node is perfect for this, as this node creates organic looking wave and crack-like patterns, and the node provides several settings that make it easy to scale or randomize the result. The two voronoi nodes used the following settings:
- Main node:
Voronoi [Voronoi: Scale 82, Jitter 45, Seed 102163], [Warp: Complex, Freq 10, Amp 17, Oct 12], [Advanced Set.: ScaleX 1.0, ScaleY 1.0, Funct Euclidian, Form D], [Modifying pannel: [CLMP 0, 2]].
- Secondary node, adjustments from main node only:
Voronoi [Warp: Amp 14], [Advanced set.: ScaleX 2.0, ScaleY 2.0]
These values were the result of some experimentation, and should be considered as guidelines. Most important for this use was setting the mode to 'D', as this designates the type of algorithm the node uses to generate the noise. Different modes create very different results. Warp settings were adjusted until there was some unevenness, while maintaining the general regularity expected from ice-cracks.
The two nodes were combined using a Combine, Add, 14% node. This low blend-strength results in some of the details from the secondary node being added to the main node, but without completely overtaking the whole or making the texture too visually 'busy'.
As the main terrain for this texture is now completed, the output of this node is used to create a normal-map using the Normal Map node. Designing the colours for this texture is, again, the result of experimenting with, and continued adjustments of, different settings. In general however:
- Several 'Data' nodes were used as the inputs for the
QuickColour and SatMaps nodes. These include the Texture, Soil, and SurfTex nodes. The goal of these nodes is to provide more colour variation and noise than what would result from connecting the colour nodes directly to the heightmap.
- Several stages of
QuickColor nodes with slightly different inputs and colour settings are blended together, to get more complex variation in colour.
- White highlights are added using the
SurfTex nodes.
To ensure that the texture was seamlessly tileable, the two voronoi nodes were, initially, individually attached to a Seamless node, which adjusts the edges of the texture to ensures that it will be able to be tiled seamlessly. Later tests in the editor showed that adding a Seamless node before colourizing the texture would result in a visible line regardless of the now seamless terrain. To resolve this issue, Seamless nodes were added after the texture was colourized. As Seamless nodes will not accept the 3-channel colour outputs provided by colour nodes, an RGBSplit node was used to seperate the 3-channel input into 3 1-channel outputs, which were individually connected to a Seamless node before merged back into 1 3-channel output using the RGBMix node, which resolved the issue. Similarly, a Seamless node was added between the Combine node containing the completed terrain and the Normal Map node that was previously connected directly. The settings of all the Seamless nodes were, naturally, identical.
Final colour corrections were made using the ColorFX node, including adjustments to brightness and contrast, HSL, and autolevel. Lighter and darker versions of this texture were similarly created using additional ColorFX nodes, adjusting the brightness and contrast, as well as the HSL as necessary.
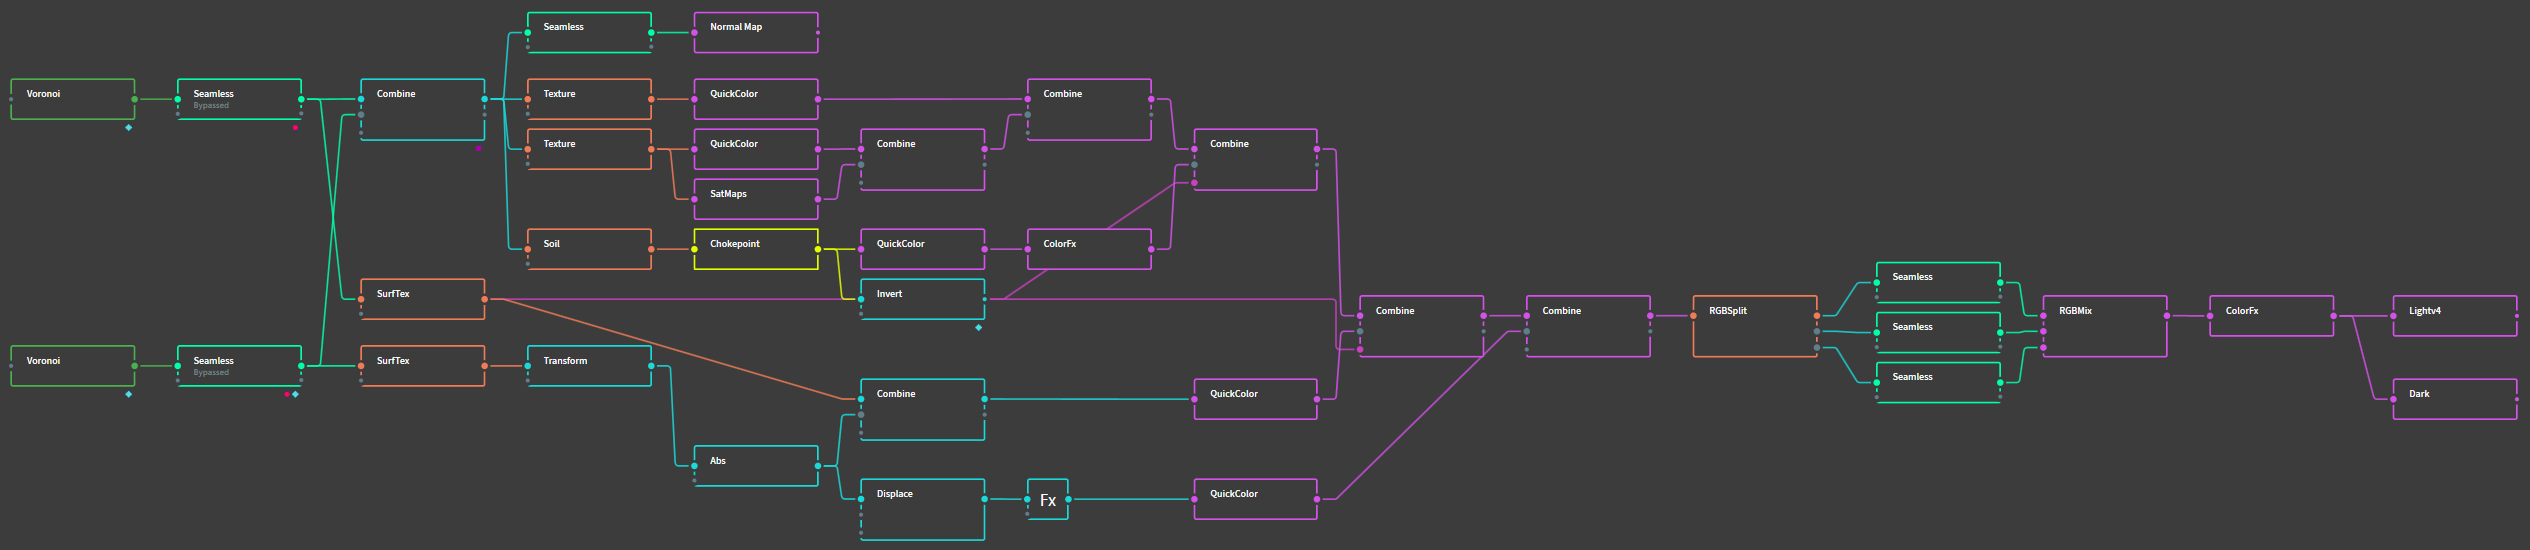
Figure 6: The complete graph for the Ice texture. Note that the two Seamless nodes connected to the Voronoi nodes are bypassed, which de-activates their effects. These two nodes were left in the graph to support the above explanation on the use of the Seamless nodes.
Remaining questions
This tutorial should provide you with all the basic knowledge needed to start making your own map design and custom textures. However, if you are left with questions or need help, your best bet is to check with people in the FAF discord Mapping-General channel. Alternatively, you may send me (IndexLibrorum, or Prohibitorum) a PM on discord, or leave a message on the forum.
")