About decals: converting normal maps
-
Parts
- Introduction on decals
- Converting normal maps
- World Machine Templates
- Generating a map-wide normal texture
- Generating a map-wide lighting texture
Requisites
Image editing tools, such as:
About normal maps
A
normal mapis a graphical term used to describe surface texture. They are used throughout games to create a sense of detail on entities. The geometry of an entity is generally limited - geometry is expensive to process. A clear example of this is the (at times: extensive) usage of decals that function as normal maps on various maps.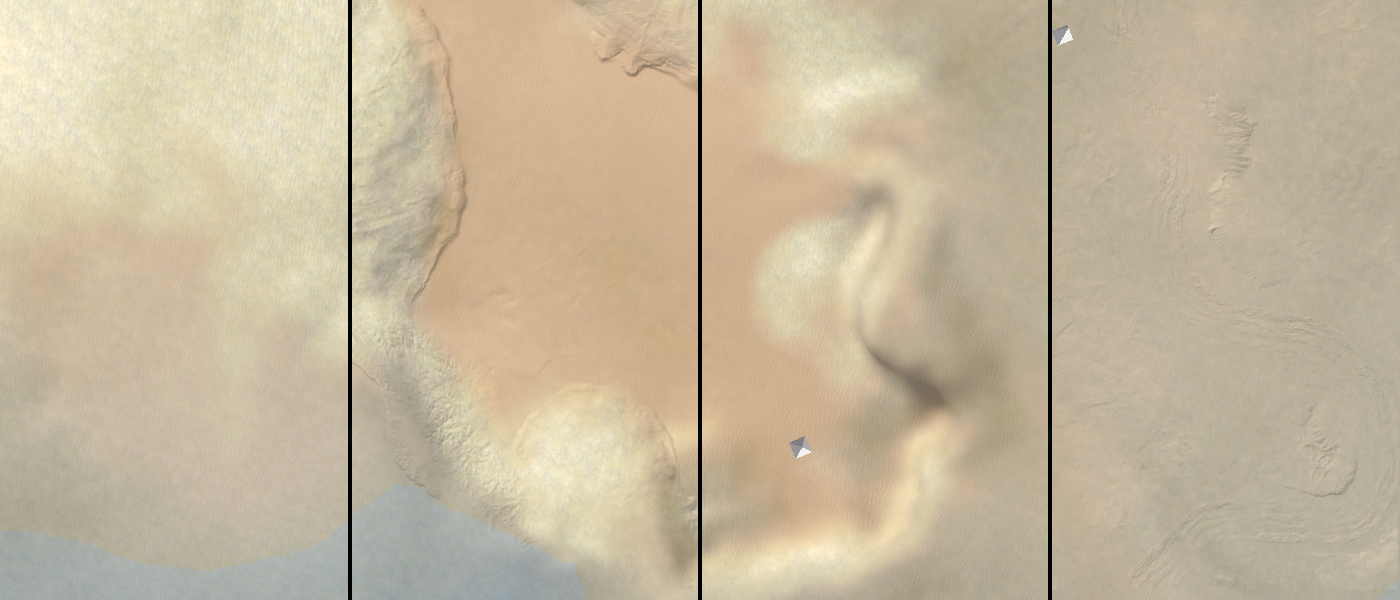
One of the examples in the introduction article on decals that shows a terrain with and without decals that function as normal mapsA more general introduction of normal maps is that of a flat plane that represents a brick wall. The joints between the bricks are too detailed to represent in the geometry and therefore we fake this feeling of detail with normal maps.
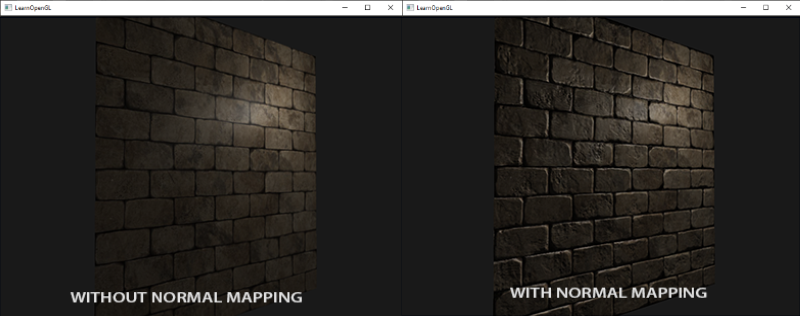
An example from LearnOpenGL that clearly shows the increase in detailToday, in the (more) modern age, geometry is no longer a limiting factor given that tessalation exists. On top of that, normal maps are replaced with PBR maps - which is topic that needs an article or 10 on its own.
In Supreme Commander there are two types of normal maps used throughout the game:
The typicalpurple normal mapcommonly used on units and as a strata normal map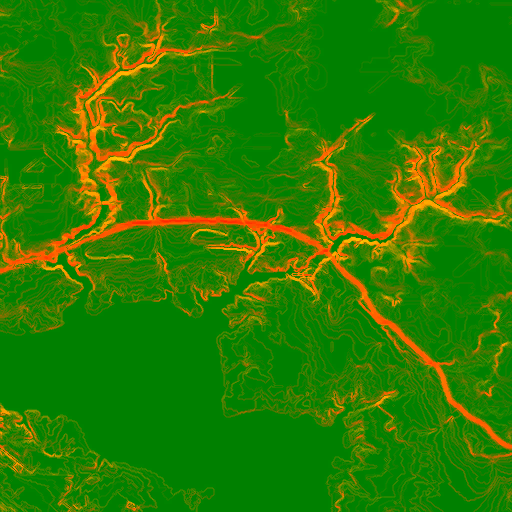
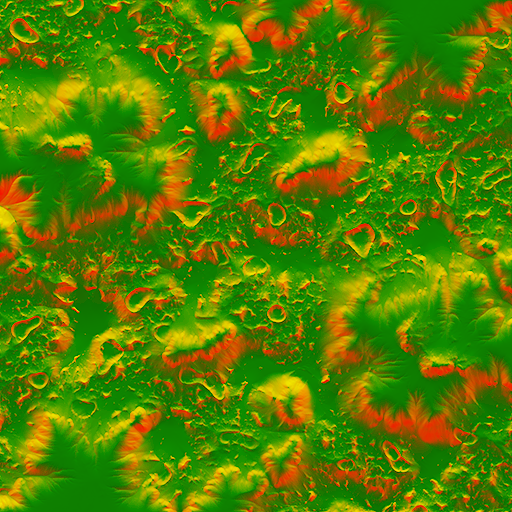
A more uncommongreen normal mapused for decals to add in detail into the terrainAbout the green normal map
The green normal map is a different format that is more friendly to compression.
We have four channels: R, G, B and A. The Red channel represents the alpha channel in the new format. The Green and Alpha channels represent the normal map and the Blue channel can be discarded due to a math trick: it can be re-computed in the shader dynamically - shaving off valuable storage that the texture will take on disk.
Transformation
For this article I assume that you have a
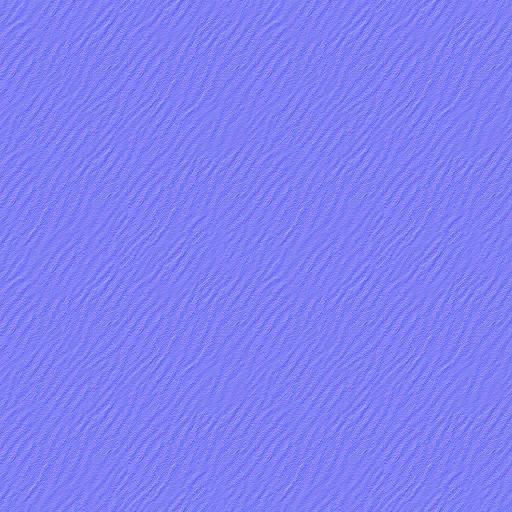
purple normal mapthat you want to turn into agreen normal map. For the sake of this guide we'll use the following normal map: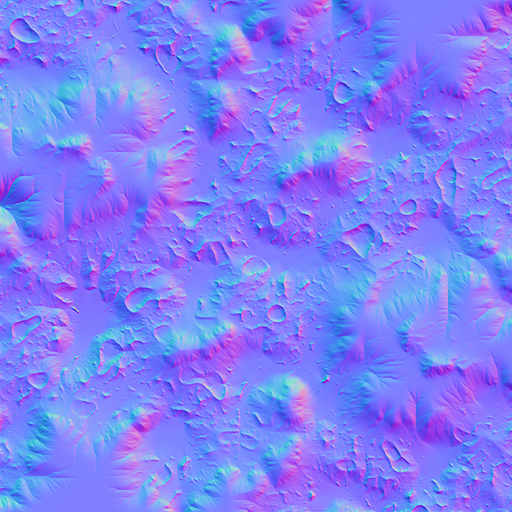
Thepurple normal mapthat we'll use throughout this article. It represents a map-wide normal map for the map Mellow ShallowsProcedure in Photoshop
- Open the
purple normal map - Go to
Channels(not Layers) view - Click on
New channelto add an alpha channel Copythe content of the red channel into the alpha channelCopythe content of the blue channel into the red channelInvert (CTRL + I)the red channel- Make the blue channel completely black via a black brush
Procedure in Gimp
- Open the
purple normal map - Open
Layers(not Channels) view - Decompose the Image via
Color > Components > Decompose > RGB - Select the
Bluelayer -
- Invert it via
Color > Linear Invert
- Invert it via
-
- Use Levels to remove the decal on low slopes via
Color > Levels > 0-25/50(The decal content will overlay all other normal information in the map, where the alpha is white. It will be transparent/invisible where the alpha is completely black)
- Use Levels to remove the decal on low slopes via
- Compose new Image with Alpha via
Color > Components > Compose > RGBA -
- R = B (Linear Invert + Levels)
-
- G = G
-
- B = B (will be removed later)
-
- A = R
- Turn Blue channel completely black (e.g.
Color > Curves > Channel Blue > Turn it to zero
Common last steps
The result of this procedure should be similar to:

An example output of the full procedureAs mentioned before - the red channel is the alpha channel. Hence - if you're seeing no red on your texture then the normal map will be hardly visible. You can tune the red channel to make it more visible, as an example we increase the contrast of the red channel significantly:
An example of tuning the red channelStore the file in the
.ddsformat. In Photoshop make sure to save it asBC3 with interpolated alphaor in Gimp asDXT5. They are the same format but with a different name.Transformation by Balthazar
Balthazar made a video about an alternative transformation that produces better results. You can view his video at:
Technical discussion
Tell me about the rendering procedure
Happy to. The following code is the shader code that processes the
green normal mapfor rendering.// as part of effects/terrain.fx float4 DecalsNormalsPS( VS_OUTPUT inV, uniform bool alphablend ) : COLOR { // read textures float4 decalMask = tex2Dproj( DecalMaskSampler, inV.mTexDecal ); float4 decalRaw = tex2Dproj( DecalNormalSampler, inV.mTexDecal ); float3 decalNormal; // compute x/z and recompute the y axis decalNormal.xz = decalRaw.ag * 2 - 1; decalNormal.y = sqrt(1 - dot(decalNormal.xz,decalNormal.xz)); // rotate the decalnormal by the decal matrix to get the decal into world space // from tangent space decalNormal = mul( TangentMatrix, decalNormal); decalNormal = normalize(decalNormal); // our blend mask is stored in the r channel of the decal float blendFactor = decalRaw.r; // get decal normal back into 0..1 range and output decalNormal = (decalNormal * 0.5) + 0.5; return float4( decalNormal.xzy, blendFactor * decalMask.w * DecalAlpha); }There are two relevant texture look-ups:
decalMaskrepresents a small cut-off at the edge of any decaldecalRawrepresents ourgreen normal map.
We base-line the
x/zvalues from the raw texture . Any normal is normalized which means that the length of the vector (a normal represents a vector) is normalized too. We can use this principle to compute theyelement - since the length (sqrt(x*x + y*y + z*z)) must equal to 1.This is why we can remove the blue channel as we only need the alpha and the green channel to represent the full texture. In turn, the blue channel can be more easily compressed by compression software, such as Peazip. And that is exactly what happens as the
.scdfiles in the data folder of the game are essentially.zipfiles with a different extension.Last but not least we use the red channel of the raw texture as part of the computation of the alpha channel. The alpha channel represents transparency - that is how we can stack multiple normal decals on top of one another. They are all rendered on top of one another but due to this transparency a normal decal that is underneath can still be visible.
We can summarize that for the
green normal mapits channels are used as:- Red: As transparency
- Green: as the z coordinate of the normal
- Blue: unused
- Alpha: as the x coordinate of the normal
Why does the blue channel become the red (alpha) channel?
The blue channel represents the Y-direction of the normal. In Supreme Commander the Y-axis is the up-axis - when you move a unit in the Y-direction it moves up into the air.
By using the Y-axis as our alpha channel we are essentially saying: we want the bits that point upwards to be visible. When we invert it we are saying: we want all the bits but those that point upwards to be visible. Via tuning we can make those bits more or less visible - as we did in this guide.
What is the pros / cons of having a completely white red (alpha) channel?
An advantage is that the size of your texture will be smaller on disk after compression. A map (or mod) is for example compressed on the server - when a channel is completely uniform then it will result in a lower total file size and therefore less bandwidth for the server.
A disadvantage is that any other (normal) decal that is below your normal will be non-existent. When you are making a map-wide decal than this may be intended - but for a typical decal this is not recommended.
And another major disadvantage is that you completely throw away the normal textures used in the strata layers. As this normal will override all of them with - at times - nothing in it! This is a big issue as you are essentially throwing away detail.
Sources
For more information on why the terrain uses a different type of normal map:
For more information on normal maps in general:
- https://learnopengl.com/Advanced-Lighting/Normal-Mapping
- https://docs.unity3d.com/Manual/StandardShaderMaterialParameterNormalMap.html
For more information about the DDS format:
A well written guide of how normal maps are used in another: Smash 4!
About you
If you have interesting sources, approaches, opinions or ideas that aren't listed yet but may be valuable to the article: feel free to leave a message down below or contact me on Discord. The idea is to create a bunch of resources to share our knowledge surrounding development in Supreme Commander.
If you've used this resource for one of your maps feel free to make a post below: I'd love to know about it!
Credits
With thanks to @svenni_badbwoi for the Gimp procedure and to @Balthazar for various help along the way.
-
 J Jip referenced this topic on
-
J Jip referenced this topic on
-
@jip said in About decals: converting normal maps:
Store the file in the .dds format. In Photoshop make sure to save it as BC3 with interpolated alpha or in Gimp as DXT5. They are the same format but with a different name.
Scratch that - gpg editor was quirking out and not updating… All good here.
Hello! It looks like you're interested in this conversation, but you don't have an account yet.
Getting fed up of having to scroll through the same posts each visit? When you register for an account, you'll always come back to exactly where you were before, and choose to be notified of new replies (either via email, or push notification). You'll also be able to save bookmarks and upvote posts to show your appreciation to other community members.
With your input, this post could be even better 💗
Register Login