FAForever Forums
    • Categories
    • Recent
    • Tags
    • Popular
    • Users
    • Groups
    • Login
    1. Home
    2. Slykar
    3. Best
    The current pre-release of the client ("pioneer" in the version) is only compatible to itself. So you can only play with other testers. Please be aware!
    S Offline
    • Profile
    • Following 1
    • Followers 0
    • Topics 2
    • Posts 28
    • Groups 0

    Posts

    Recent Best Controversial
    • RE: AI Wave Survival Mod Information

      Hi, your Airdrop response to destroyed support bases are coming from the edges of the map.

      if possible, it should be happen from the same position we saved in the settings. Example: Center only.
      Once on the map Griffin, the transporter came from the edge of the map at the very top left, that is at Fort Clarke. It was shot down, of course, because our base was there. I liked the 10k Mass donation.

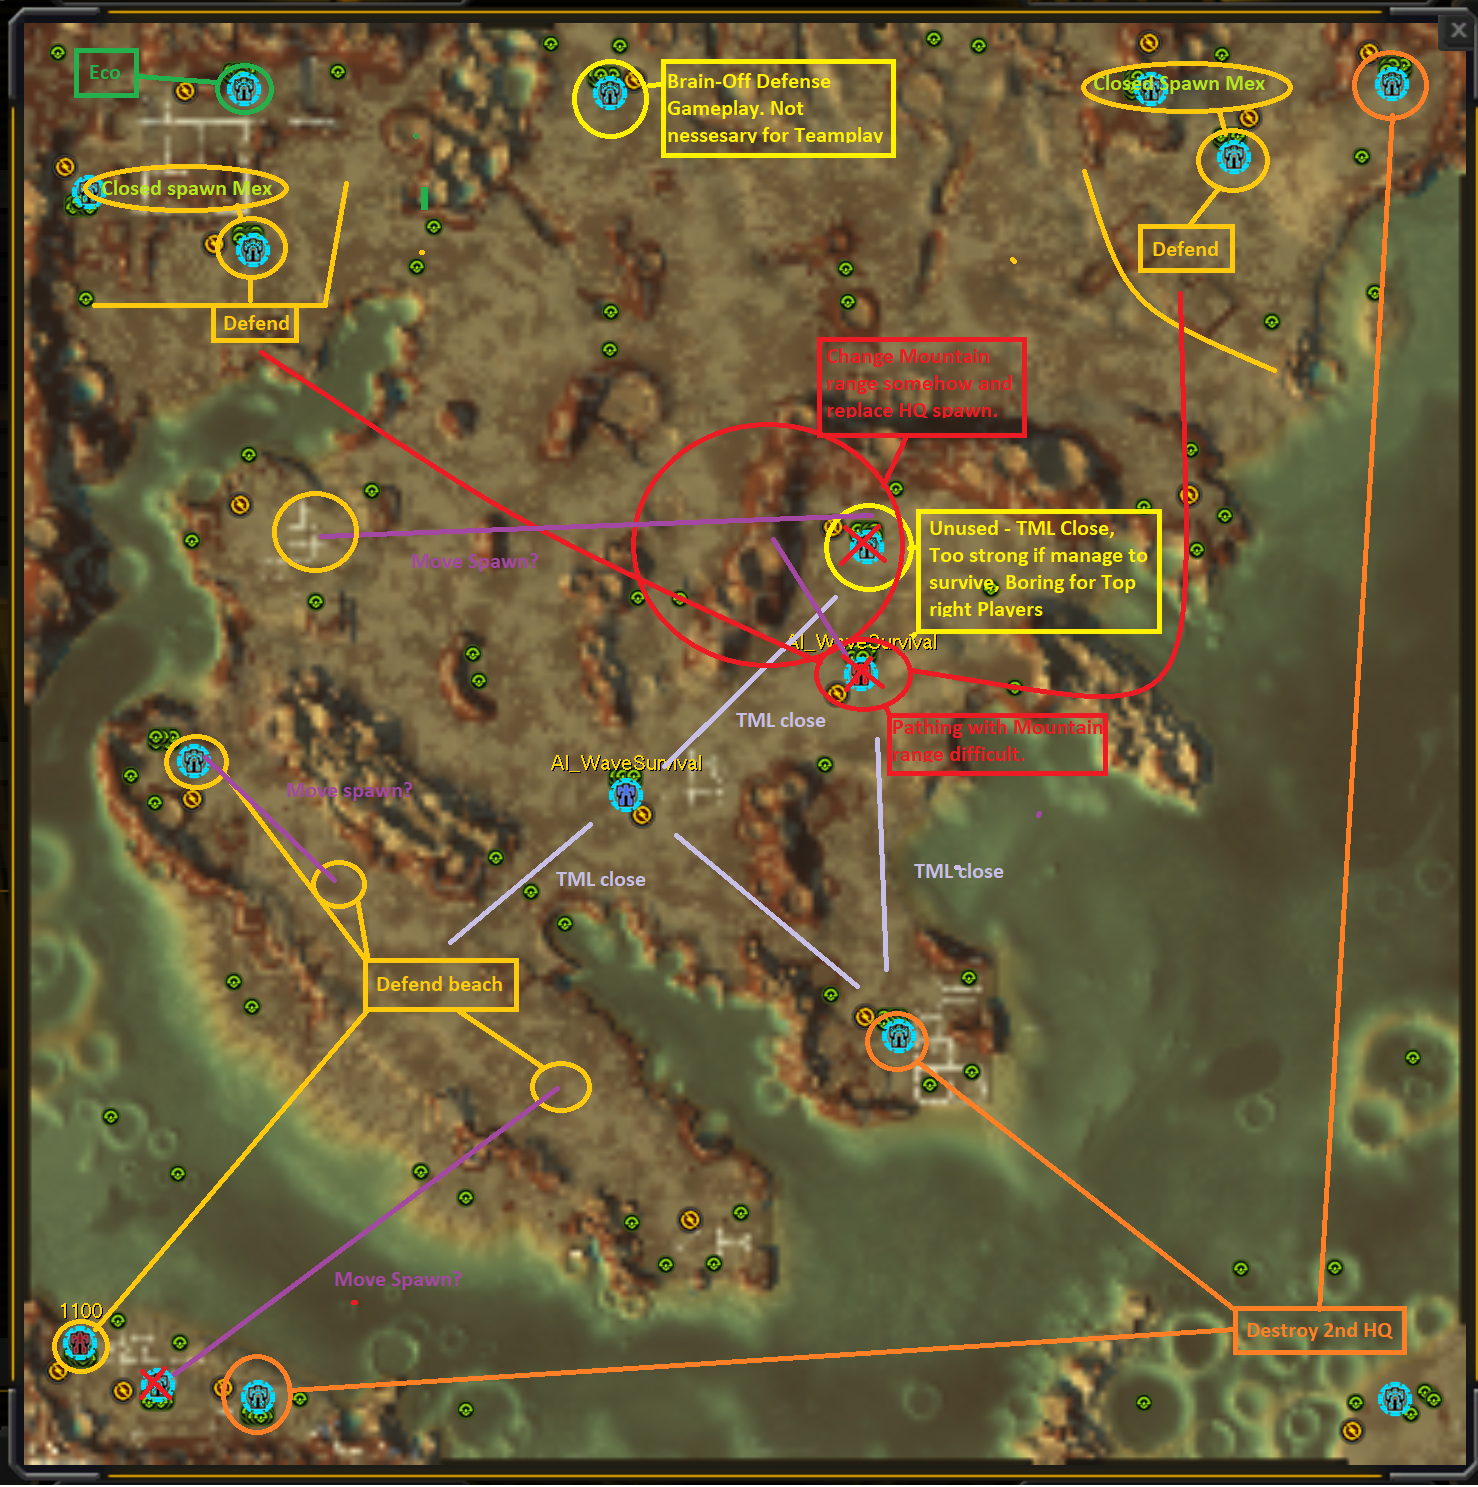
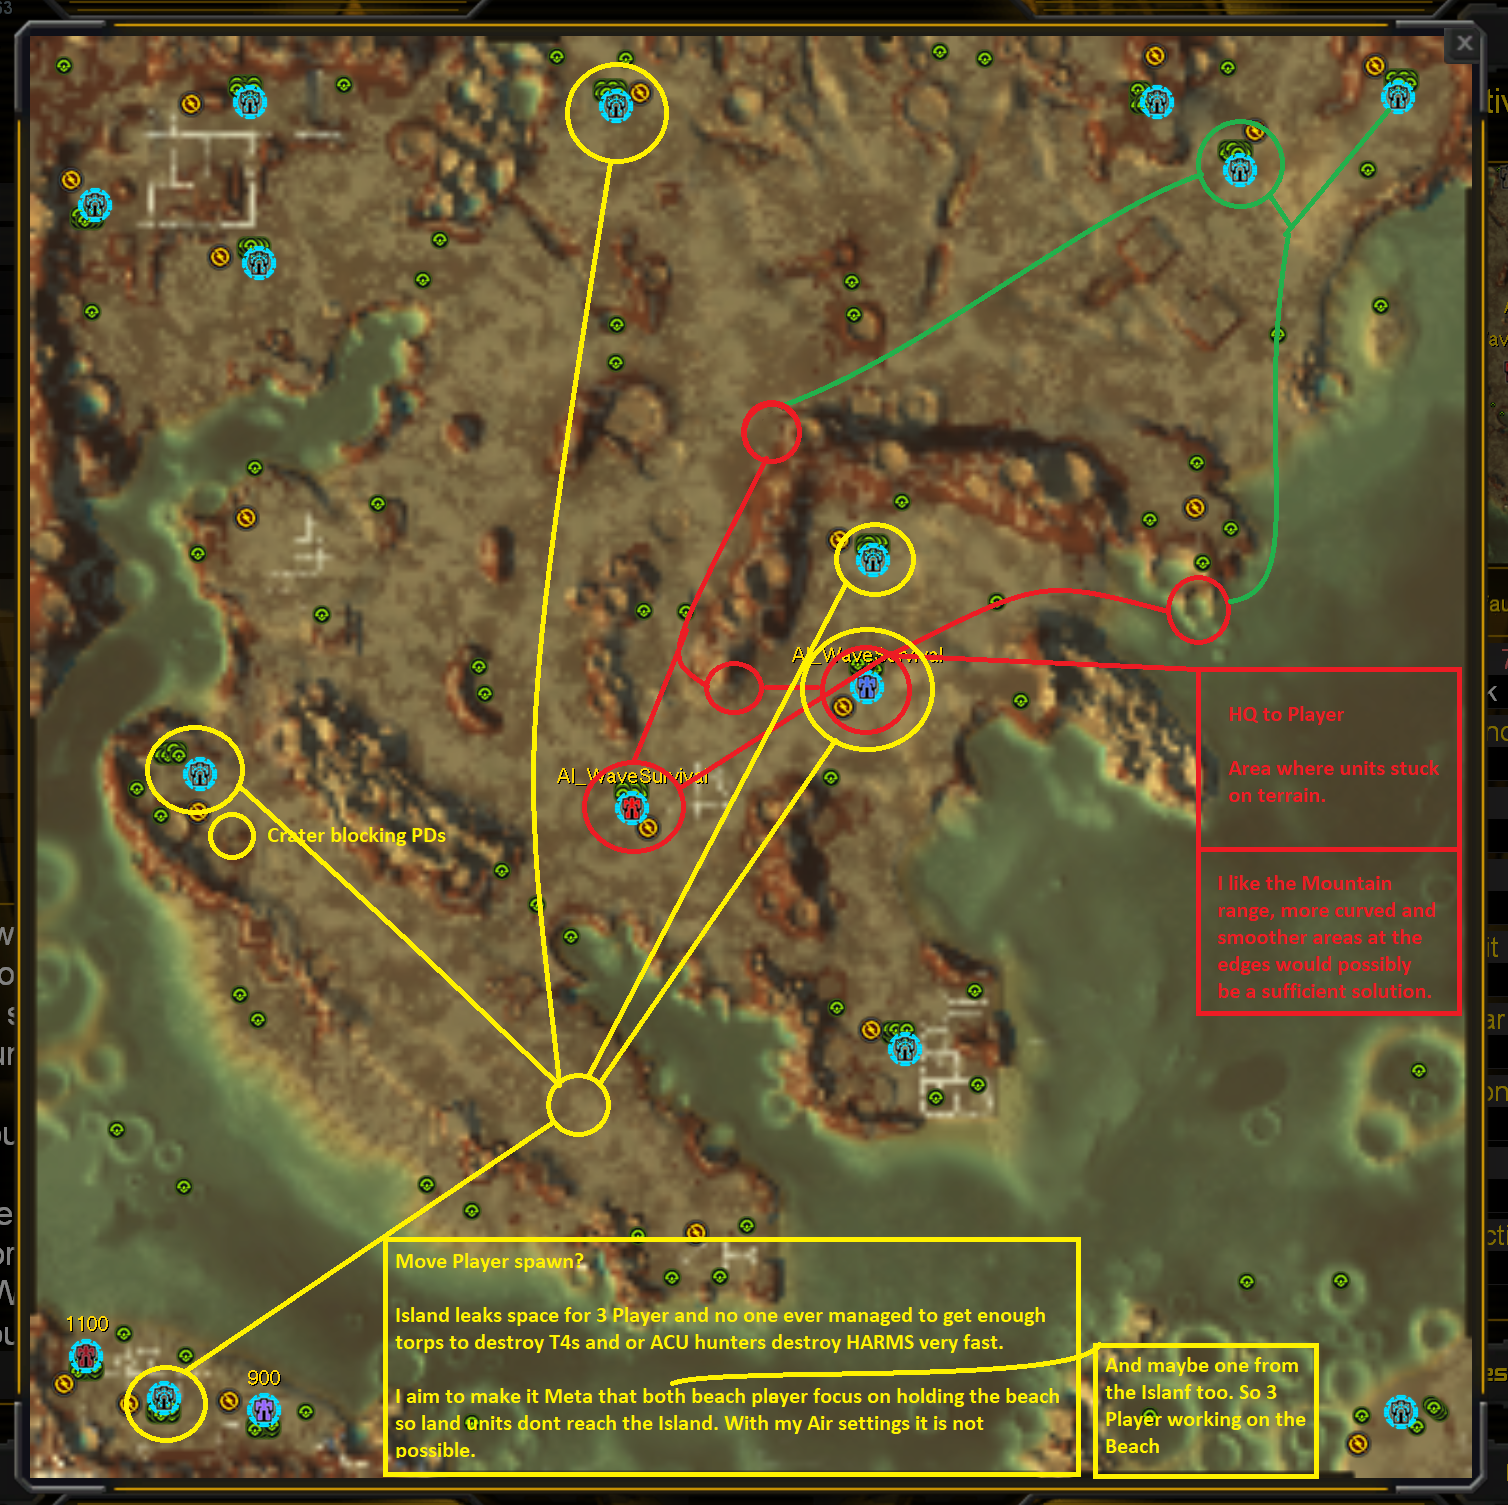
      I also made some notes to your Map and hope you have the time so give it a quick view.

      In the first Screenshot is the problem. Everything else is extra.

      Extra:
      For the 2nd Screenshot, i added my played and recommended meta. In total i recommend to change 3-4 spawn points.

      I do not like to give Slot 14 (AI Wave Survial in blue) the job to defend the beach, as it would be boring for the island player. Either Slot 14 survives and island ecos = free win or he dies and Island has no defenses built...
      I would only do it, if we have no full lobby.

      For Slot 15 and 3 i recommend to move it more to the center of the beach BUT far enough away from the AI-route to the island. Air units targting Slot 1 ans 2 (Island) should not swtich the targets mid flight.

      Slot 10 and 11 are unusable. i cant give it a player. Worse as slot 14.

      For Slot 10 i recommend to move it to the left area. The player will have a reason to fight for the 4 mexes and can help in a lot of ways. Navy, Def top left, Def south, Eco.

      Slot 11 would be the new main HQ slot. Maybe the slot position is fine but the north-, south-mountain range must change. West-East looks fine and should split land units going the water route and the land route to the top right player.

      Even if you do nothing. Thank you for your nice mod!

      Griffin - Ideas.png

      Griffin - Meta Adjustments.png

      posted in Modding & Tools
      S
      Slykar
    • AI Wave Survival - Air Nightmare Slykar

      Hello everyone,

      I wanted to share the settings I use for this map. If you enjoy playing it, feel free to share your own settings and explain why you use them. I'm always interested in trying new approaches.

      Most importantly, a huge thank you to Rama and AKarmy01 for creating this amazing mod.

      About the Map

      The map features a unique gameplay flow. The first 8–10 minutes are an intense build-up phase where build power is limited and every decision matters. This is followed by heavy combat, resource shortages, and a final stage where build power once again becomes a critical bottleneck. No matter how experienced you are, you will constantly have to adapt to changing challenges.

      Depending on your starting position, securing enough energy can become a challenge of its own. At the same time, surviving alone is almost impossible, making teamwork essential. Victory requires a coordinated team that can support each other throughout the entire game.

      With 11 different playable positions, the map offers excellent long-term variety and replayability. Some positions are thrown straight into the action from the very first minute, while others enjoy a calmer start before eventually facing their own intense challenges later in the game.

      I recommend 8–9 players for the best overall experience.

      Fewer players make the map significantly easier.
      More players tend to slow the game down too much.
      Do not allow players with a CPU score above 150–200, as this can negatively affect performance for everyone.

      Settings & Reasoning

      Overall Settings

      1. Unit Count

      Too many land and naval units tend to block each other and create pathfinding issues.

      1. Air Units

      Air units create the most dynamic gameplay. They engage quickly, die quickly, and generate reclaim rapidly, which helps player progression.

      Because air units are short-lived, they also place less strain on performance compared to large numbers of land units.

      1. Air Balance

      More air units means more action and more fun.

      For that reason, I prefer not to modify:

      Unit HP
      Damage
      Speed

      1. Performance Adjustments

      If the game becomes too slow due to excessive unit counts or reclaim:

      Reduce Air from 40 to 32
      Increase damage by roughly 20–30%
      Set reclaim to despawn after 3 minutes

      I do not support Reclaim Turret mods. In my opinion, learning how to use reclaim efficiently is a core part of the game and a skill every player should develop.

      The settings I use on this map are ideal for making reclaim more accessible and rewarding for players who are still learning how important it is.

      If you notice a teammate who isn't using reclaim, I would really appreciate it if you took a moment to ask whether they'd like to learn more about it—just as I do. Teaching newer players how to use reclaim effectively helps both the player and the community as a whole.

      Slot Roles & Player Limits

      Three slots are closed and replaced with Mex spawns.

      Two of those locations simply do not provide enough room to build a proper base.

      The third closed slot (top-left area) reduces enemy spawn pressure and makes the position easier to defend. It also encourages players to occupy the remaining slots, creating a more balanced match.

      Top Left
      Slot 7 – Easy – ECO

      Energy production for the team
      Experimental/Game Enders
      Build SMD coverage for the front line

      Slot 8 – Hard – FRONT

      Hold the line
      Keep both Mex alive

      Top Right
      Slot 6 – Normal – ECO / Navy / Front Support

      Support the front line
      Build Game Enders
      Transition into Navy later

      Slot 4 – Hard – FRONT

      Keep both Mex alive

      Island
      Slot 1 – Normal – ECO

      1.5x Mex economy
      Rush Monkeylord
      Navy
      Game Enders

      Slot 2 – Normal – FRONT / ECO

      1.5x Mex economy
      Survive
      Game Enders
      Navy later

      Beach
      Slot 10 – Normal – Front Beach

      Survive
      Support Slot 12
      Maintain naval control
      Provide SMD coverage for Slot 12

      Slot 11 – Easy – ECO / FRONT

      Protect the rear of Slot 12
      Secure the mountain against air attacks
      Transition into Game Enders

      Slot 12 – Very Hard – FRONT

      Survive

      Slot 13 – Very Very Hard – FRONT

      Survive
      Rush Monkeylord
      Navy

      How to Win

      The map can be completed using almost any strategy:
      Land, Navy, Air, Experimentals, Game Enders, Nukes, TML

      However, combined-arms strategies generally have the highest chance of success.

      Recommended Strategy

      1. Destroy or Capture Rift Orbs

      2. Rush Monkeylords

      One to three players should rush Monkeylords and move them toward the second HQ as quickly as possible.
      Recommended slots:
      1, 2, 10, 13

      Use at least two Monkeylords and snipe the second HQ from the water between waves.

      1. Weaken HQ Defenses

      ECO players should get two Scathis online as soon as possible and focus fire on the HQ to weaken its defenses.

      1. Destroy Support Bases

      ECO Player uses Nukes, TML, Game Ender to destroy all Support bases

      1. Naval Siege

      Use MML ships to continuously siege the HQ.

      Seraphim Carriers are particularly effective because: MML, AA and a safe Air Production

      Once the HQ's defenses have been weakened (see Step 2), even T1 and T2 bombers can contribute significant damage.

      1. Final Assault

      Gather T4 land units and reinforcements beneath the naval siege force.

      If necessary, launch a coordinated T4 land assault between waves.

      A well-timed T4 push against the HQ can secure victory.

      Hosting:
      Slot 2 - Close Spawn Mex
      Slot 5 - Close Spawn Mex
      Slot 9 - Close Spawn Mex
      Slot 14 - AI WAVE MAIN HQ
      Slot 15 - AI WAVE 2nd HQ
      Slot 16 - AI WAVE Alternate HQ

      Map:
      Adaptive Griffin Survival

      Mod:
      1% Particle
      1,5x Build Range
      1,5x Storage Capa
      25% Air Crash Damage
      AI Wave Survival
      All Faction Q-Gate
      Hive Engi for all
      No Friendly Fire

      Settings:

      HIDE DEFAULT

      Share Condition ---> Full Share
      Victory Condition ---> Sandbox
      Prebuilt units ---> on

      AI Unit Cap ---> 2.000

      HQ Settings:
      HQ Health ---> 2,5m

      HQ Alternate Health ---> 0,15m
      HQ Schields ---> AAA-Tier

      2nd Spawn Schields ---> B-Tier
      2nd Spawn Point Defense ---> Vanilla PD C-Tier
      1a 2nd Spawn Land ---> 0%
      1b Recover Land to HQ Spawn ---> 0%
      2a 2nd Spawn Air ---> 30%
      2b Recover Air to HQ Spawn ---> 0%
      3a 2nd Spawn Navy ---> 100%
      3b Recover Navy to HQ Spawn ---> 0%
      Units Suicide Timer ---> 10 Min

      WAVE SETUP
      1a Build timer ---> 6 Min
      1b Air Delay ---> 1 Wave
      1c Navy Delay ---> 2 Wave
      2 Delay between waves ---> 2,5 Min
      4 Wave Tech Progression ---> 65%

      6a Land units Per Player ---> 15
      6d Land units Wave Multiplier ---> 2x -> 1x
      6e Land Experimental ---> 70%

      7a Air units Per Player ---> 40
      7c air units Wave Multiplier ---> 5x -> 1x
      7d air Experimental ---> 30%

      7a Navy units Per Player ---> 4
      7c Navy units Wave Multiplier ---> 1x -> 2x
      7d Navy Experimental ---> 30%

      SPEED/HP SETTING
      BOOST DAMAGE ---> 0x

      AIRDROPS
      DROPS: AIR DROPS ON/OFF ---> 2-3 Min
      DROPS: AIR DROPS PER WAVE ---> 30
      DROPS: AIR DROPS MULTIPLAYER ---> 3x -> 1x
      DROPS: AIR DROPS UNITS ---> all
      DROPS: AIR DROPS RAMBOS ---> 30%
      DROPS: AIR DROPS EXPERIMENTAL ----> OFF
      DROPS: AIR DROPS SPAWN LOCATION ---> Spawn Center only

      EXTRA WAVE/RESPONSE
      2a AntiAir Response Wave ---> 0,25x
      2b Extra ASF ---> 0,5x

      5a ACU HUNTERS ---> 0,5% Hold Timer
      6b Paragon Nuke ----> ON

      SB3: Nuke/Arty -----> ON
      SB5: Power Stall ----> 6 Min

      ENDGAME SETTING
      1b Endless Delay ---> 0 Min
      2a Boss Land Units ---> 1
      2b Boss Air Units ---> 8
      2c Boss Endless Final Wave ---> 3 Min
      3c ARTY ENDGANME ---> Scathis

      4a DOOM ENDGAME WAVE ---> 2 Dooms per Wave
      4b DOOM HQ Damage ---> 5%
      4c DOOM WAVE ---> 2 Units
      4e DOOM MAX SIZE ---> OFF
      4g DOOM STORM ---> 0,5

      5b Allied Forced ---> 5x

      ECO BOOST SETTING
      ECO1: ---> 25
      ECO4a ---> 120 Sec
      ECO4b ---> 2x Rate

      NUKE STRIKE SETTINGS
      NUKE Strikes ----> Offensive
      NUKE TIME STARTING TIME: ----> 60% of Hold Time
      NUKE STRIKES FREQUENCY ---> 4-5 Min
      NUKES per Strike --> Regular
      NUKES: INCREASE ----> 2 per Player

      BUILD RESTRICTIONS
      Build Max: Hives ---> 100
      posted in General Discussion
      S
      Slykar
    • RE: AI Wave Survival Mod Information

      UPDATE 04.02.2024
      Hello Everyone,

      as my lobbies gets full within 10 Min and we have a lot of cool mates to play it almost daily, i wanted to share my settings so everyone may enjoy the madness.

      If you like to see what you will face, i added my all time favorit match.
      https://replay.faforever.com/20802514

      If i missed something or it is incorrectly listed, please inform me.

      Map: Griffin v7 - only what is NOT default

      Slykar Settings:

      Share conditions - Fullshare
      Victory condition - Sandbox
      Reveal Civillian - no
      Prebuilt Units - on
      Score - on
      HQ Spawn Slot - 16
      HQ HP 2,5 Mio
      HQ ALT Spawn - 14
      HQ ALT HP 0,15 Mio
      HQ Schild XXXXX - AAA-Tier
      HQ PD XXXXX - A-Tier

      2nd HQ Spawn - Slot 15
      2nd HQ Schild XXXXX - C-Tier
      2nd HQ PD XXXXX - C-Tier
      1a. 2nd Spawn Land % - 0%
      1b. - 0%
      2a. - 30%
      2b. - 0%
      3a. - 100%
      3b. - 0%

      SALVATION PLAYERS - Off

      WAVE SETUP

      Build Time - 8 Min
      Delay between Waves - 2,5 Min
      Hold Time - (Rating full Lobby (10): +-5000 = 40 Min+, +-7500 35 Min+, +-10.000 30 Min+)
      Wave Tech Progression - 65% slower

      6a. - 20
      6b. - Amp
      6d (1). - 2x 1.75x 1.5x 1.25x 1x
      6d (2) - 80%
      7a. - 40
      7c. - 5x 4x 3x 2x 1x
      7d. - 20%
      8a. - 10
      8b. - 1x ------ 2x (Reverse 2x 1.75x 1.5x 1.25x 1x)
      8c. - 20%

      SPEED / HP SETTINGS:

      Boost Damage - 0x

      AIR DROPS:

      Airdrops on / off - every 2 - 3 Min
      Airdrops per Wave - 30
      Airdrop Wave multip. - 2x 1.75x 1.5x 1.25x 1x
      Airdrop Unit Types - all
      Airdrops Rambos - 30%
      Airdrop EXP - off
      Airdrop Spawn - Center only

      EXTRA WAVE / RESPONSE

      2a. - off
      2b. - 0,5x
      3a. - 0,50%
      4b. - on

      ENDGAME SETTINGS:

      1a. - Land, Air, Navy
      1b. - 0 Min
      2a. - 3 Units
      2b. - 10 Units
      2c. - 2 Min
      3c. - Scathis
      4a - 2
      4b. - 5%
      4c. - 2 Units +
      4e - off
      4g. - 0,50x
      5b. - 5x

      ECO SETTINGS:

      ECO 1 - 25
      ECO 2a - off
      ECO 4a - 240 Sec

      Nuke Strike Settings:

      Nuke Strike on / Off - Offensive
      Nuke Start Time - 0,60%
      Nuke Frequenzy - 5 - 6 Min
      Nuke per Strike - Regular
      Increase Nukes per Strike - +2

      Build Restrictions:

      100 Hives
      AI Unit Cap 2000

      In Lobby:

      Add 8 Mods

      Optional - 1,5 Build Range
      Optional - 50% Air Craash Damage
      Must have - AI Wave Survival created by AKarmy01 & Rama
      Optional - All Factions Quantum Gate
      Must have - Anti Nuke 50 Cost
      Must have - Hive Engineering Stations for all
      Must have - No Friendly Fire (Because of AOE PDs)
      Optional - 10% Particales

      Add 3x AI_Wavesurvial to slot 14, 15, 16

      Close but spawn Mex for Slot, 5, 9, 3

      Slot 3 is Optional but you must never start as 13. it will be too slow. 11 is doable.

      Dont let 200 CPU player play. If someone is slow but others not, ask him to close programms.

      CPU around 150 shouldnt slow down the game at all or -1 / -2 worst case. (Kill faster and reclaim more)

      posted in Modding & Tools
      S
      Slykar
    • RE: AI Wave Survival Mod Information

      Hello Rama,

      could it be, that UEF Engi Station-Drones count as high level Air units, that spawn extra ASFs?

      if someone builds UEF Engi Station they get usually 50-100 ASF per Wave which doesnt makes sense. Only if they count like a T4 Unit and spawn 9 ASF per Engi Station. Or your Settings set a fixes %-Spawn of ASF if any Air units exists. Does it lower Gunships and Bomber then?

      posted in Modding & Tools
      S
      Slykar
    • RE: AI Wave Survival Mod Information

      Hello Rama,

      i just had a game where we spammed about 40 EMP Launcher and destroyed 2nd HQ and a few support bases easily.

      it cost 4k mass per launcher but how much per missile?

      15k dmg per missile on buildings could be a bit overpowered if the mass cost is low.

      1 EMP Missile = 15k Dmg (Dmg per Mass = ? / Build time?)
      1 Nuke = 35k (cost about 15k = 2,33 Dmg per Mass and 5 or 6 min build time = 58,33 DPS on buildings)

      Additionaly i think the range is too high. maybe reduce it to t3 arty range?

      posted in Modding & Tools
      S
      Slykar
    • RE: AI Wave Survival Mod Information

      v270 tested with 4 player. no problems

      posted in Modding & Tools
      S
      Slykar